AutoDock Vina Version 1.2.3 Porting Guide (openEuler 20.03 LTS SP3)
1. Introducing to the Software
AutoDock Vina is an open source program for molecular docking. It was designed and implemented by Dr. Oleg Trott at the Molecular Graphics Lab of the Scripps Research Institute. Compared with AutoDock, AutoDock Vina significantly improves accuracy. In addition, AutoDock Vina can use multiple CPUs or CPU cores on a system to significantly reduce running time.
For more information about AutoDock Vina, visit https://vina.scripps.edu/
Programming language: C++
Brief description: an open source molecular simulation software
Open source license: Apache License 2.0
2. Introducing to Environment Requirements
2.1. Hardware
| Item | Description |
|---|---|
| CPU | Kunpeng 920 |
| Memory | 32 GB 2666 MHz x 16 |
| NIC | 1 x 10GE |
2.2. Software
| Item | Version | Download URL |
|---|---|---|
| AutoDock Vina | 1.2.3 | https://github.com/ccsb-scripps/AutoDock-Vina/archive/refs/tags/v1.2.3.tar.gz |
| BiSheng Compiler | 2.1.0 | https://www.hikunpeng.com/en/developer/devkit/compiler/bisheng |
| Boost | 1.78 | https://boostorg.jfrog.io/artifactory/main/release/1.78.0/source/boost_1_78_0.tar.gz |
2.3. Operating System
| Item | Version | Download URL |
|---|---|---|
| openEuler | openEuler 20.03 SP3 | https://repo.openeuler.org/openEuler-20.03-LTS-SP3/ |
| Kernel | 4.19.90 | https://gitee.com/openeuler/kernel |
3. Planning the Porting
The following table describes the functions and details of the software installation paths involved in the AutoDock Vina porting process.
| No. | Planned Software Installation Path | Function | Remarks |
|---|---|---|---|
| 1 | /usr/local/bisheng | Planned installation path of the BiSheng Compiler. | The installation paths listed in this table are only examples. Shared paths are recommended. All the paths used in the commands in this document are examples only. Use the actual paths planned during the installation process. |
| 2 | /usr/local/boost1.78 | Planned installation path of the Boost. | |
| 3 | /usr/local/AutoDockVina/ | Planned installation path of the AutoDock Vina. | |
| 4 | /usr/local/AutoDockvina/AutoDock-Vina-1.2.3/example/basic_docking/solution | AutoDock Vina test path. |
4. Configuring the Compilation Environment
Prerequisites: Use the SFTP tool to upload the installation packages to the corresponding directories on the server.
Configuration procedure:
| No. | Configuration Procedure | Remarks |
|---|---|---|
| 1 | Setting up the Kunpeng foundation software | For details, see section "4.1 Setting Up the Kunpeng Foundation Software" |
| 2 | Installing dependencies | For details, see section "4.2 Installing Dependencies" |
| 3 | Installing the Boost | For details, see section "4.3 Installing the Boost" |
4.1 Setting Up the Kunpeng Foundation Software
4.1.1 Yum Installation Mode
Step 1 Add the configuration file bisheng-compiler.repo to the /etc/yum.repos.d/ directory.
cat > /etc/yum.repos.d/bisheng-compiler.repo << EOF

[bisheng-compiler]

name=bisheng-compiler

baseurl=https://repo.oepkgs.net/bisheng/aarch64/

enabled=1

gpgcheck=0

priority=100

EOF
Step 2 Download and install the RPM package of the BiSheng Compiler from the yum repository.
yum update
yum install bisheng-compiler -y
Step 3 (Optional) Clear the hash table in the current window.
If an LLVM compiler of another version is available in the system, run the following command immediately after installing BiSheng Compiler:
hash -r
This prevents the Clang command from being captured by the hash table. If the Clang command is captured by the hash table, BiSheng Compiler or the open source LLVM compiler cannot be used.
Step 4 Check whether the installation is successful.
After the installation is complete, run the following command to verify the BiSheng Compiler version:
clang -v

If the command output contains the BiSheng Compiler version information, the installation is successful.
4.1.2 Software Package Installation Mode
Step 1 Make preparations.
On the BiSheng Compiler product page, click “BiSheng Compiler Software Package” to obtain the BiSheng Compiler software package and upload it to the server.
Software package download page: https://www.hikunpeng.com/en/developer/devkit/compiler/bisheng
Step 2 Install the environment dependencies of the BiSheng Compiler.
yum install -y gcc glibc libatomic bc tar
Step 3 Create the installation directory of the BiSheng Compiler.
mkdir -p /usr/local/bisheng
Note: In the preceding command, /usr/local/ is an example. Replace it with an actual path.
Step 4 Download the BiSheng Compiler package and decompress it.
cd /usr/local/bisheng
wget https://mirrors.huaweicloud.com/kunpeng/archive/compiler/bisheng_compiler/bisheng-compiler-2.1.0-aarch64-linux.tar.gz --no-check-certificate
tar -zxvf bisheng-compiler-2.1.0-aarch64-linux.tar.gz
After the decompression, the bisheng-compiler-2.1.0-aarch64-linux directory is generated in the current directory.
Step 5 Install the environment-modules tool.
yum install environment-modules -y
source /etc/profile
Step 6 Create an environment variable configuration file.
vi /usr/local/bisheng/bisheng_modulefiles
Add the following content:
#%Module1.0
conflict bisheng
prepend-path PATH /usr/local/bisheng/bisheng-compiler-2.1.0-aarch64-linux/bin
prepend-path LD_LIBRARY_PATH /usr/local/bisheng/bisheng-compiler-2.1.0-aarch64-linux/lib
Step 7 Load environment variables in the current shell.
module use /usr/local/bisheng/
module load /usr/local/bisheng/bisheng_modulefiles
Note: To prevent variables from being imported each time a shell is opened, you are advised to write the environment variables to the system configuration file. This operation is optional.
vi /etc/profile
Add the following content:
module use /usr/local/bisheng/
module load /usr/local/bisheng/bisheng_modulefiles
Step 8 Make the environment variables take effect.
source /etc/profile
Step 9 (Optional) Clear the hash table in the current window.
If an LLVM compiler of another version is available in the system, run the following command immediately after installing BiSheng Compiler:
hash -r
This prevents the Clang command from being captured by the hash table. If the Clang command is captured by the hash table, BiSheng Compiler or the open source LLVM compiler cannot be used.
Step 10 Verify the installation.
After the installation is complete, run the following command to verify the BiSheng Compiler version:
clang -v

If the command output contains the BiSheng Compiler version information, the installation is successful.
----End
4.2 Installing Dependencies
Step 1 Install the dependency packages using yum.
yum install -y libstdc++-static
4.3 Installing the Boost
Step 1 Use PuTTY to log in to the server as user root. Step 2 Create the installation package download directory and installation directory.
mkdir -p /hpc/boost/
mkdir -p /usr/local/boost1.78
Step 3 Go to the installation directory.
cd /hpc/boost/
Step 4 Download the source package.
wget https://boostorg.jfrog.io/artifactory/main/release/1.78.0/source/boost_1_78_0.tar.gz
Step 5 Decompress the installation package.
tar -zxvf boost_1_78_0.tar.gz
Step 6 Go to the decompressed directory and install libicu and libicu-devel.
cd boost_1_78_0
yum install -y libicu libicu-devel
Step 7 Compile the Boost.
./bootstrap.sh --with-toolset=clang
./b2 toolset=clang cxxflags="-std=c++11"
./b2 --prefix=/usr/local/boost1.78 install
Note: In the preceding command, /usr/local/boost1.78 is an example. Replace it with an actual path.
Step 8 Create the environment variable configuration file.
vi /usr/local/boost1.78/boost_modulefiles
Add the following content:
#%Module1.0
conflict boost
prepend-path PATH /usr/local/boost1.78/bin.v2
prepend-path LD_LIBRARY_PATH /usr/local/boost1.78/libs
Step 9 Load environment variables in the current shell.
module use /usr/local/boost1.78/
module load /usr/local/boost1.78/boost_modulefiles
Step 10 To prevent variables from being imported each time a shell is opened, you are advised to write the configuration to the system configuration file.
vi /etc/profile
Add the following content:
module use /usr/local/boost1.78/
module load /usr/local/boost1.78/boost_modulefiles
Make the configuration take effect.
source /etc/profile
5. Obtaining the Source Code
Step 1 Download the AutoDock Vina installation package v1.2.3.tar.gz.
Download address: https://github.com/shenwei356/seqkit/archive/refs/tags/v2.2.0.tar.gz
---End
6. Performing Compilation and Installation
Step 1 Use PuTTY to log in to the server as user root. Step 2 Install the dependency packages.
yum install gcc-c++ swig -y
Step 3 Create a directory for downloading and installing the software package.
mkdir -p /usr/local/AutoDockVina
Step 4 Go to the download directory.
cd /usr/local/AutoDockVina
Step 5 Download the software package.
wget https://github.com/ccsb-scripps/AutoDock-Vina/archive/refs/tags/v1.2.3.tar.gz
Step 6 Decompress the software package.
Note: The actual name of the software package may vary.
tar -zxvf v1.2.3.tar.gz
Step 7 Go to the AutoDock Vina installation path.
cd /usr/local/AutoDockVina/AutoDock-Vina-1.2.3/build/linux/release/
Step 8 Modify the makefile.
vi Makefile
Modified content:
BASE=/usr/local/boost1.78
BOOST_VERSION=1.78
GPP= /usr/local/bisheng/bisheng-compiler-2.1.0-aarch64-linux/bin/clang++
Step 9 Perform compilation.
make -j
**Step 10 **Create an environment variable configuration file.
vi /usr/local/AutoDockVina/AutoDock-Vina-1.2.3/AutoDock-Vina-1.2.3_modulefiles
Add the following content:
#%Module1.0
conflict AutoDockvina
prepend-path PATH /usr/local/AutoDockVina/AutoDock-Vina-1.2.3/build/linux/release
prepend-path LD_LIBRARY_PATH /usr/local/AutoDockVina/AutoDock-Vina-1.2.3/src/lib
Load environment variables in the current shell.
module use /usr/local/AutoDockVina/AutoDock-Vina-1.2.3/build/linux/release
module load /usr/local/AutoDockVina/AutoDock-Vina-1.2.3/AutoDock-Vina-1.2.3_modulefiles
Add the following content:
module use /usr/local/seqkit/seqkit
module load /usr/local/seqkit/seqkit/seqkit_modulefiles
Step 11 To prevent variables from being imported each time a shell is opened, you are advised to write the configuration to the system configuration file.
vi /etc/profile
Add the following content:
module use /usr/local/AutoDockVina/AutoDock-Vina-1.2.3/build/linux/release
module load /usr/local/AutoDockVina/AutoDock-Vina-1.2.3/AutoDock-Vina-1.2.3_modulefiles
Make the configuration take effect.
source /etc/profile
----End
7. Verifying the Running
Step 1 Use PuTTY to log in to the server as user root.
Step 2 Modify the test configuration file 1iep_receptor_vina_box.txt.
cd /usr/local/AutoDockvina/AutoDock-Vina-1.2.3/example/basic_docking/solution
vi 1iep_receptor_vina_box.txt
Add the following four lines:
exhanstiveness = 32
cpu = 0
energy_range = 4
num_modes =9
The parameters are described as follows:

Step 3 Check whether the files used for interconnection are stored in the running path.

Step 4 Run the following command:
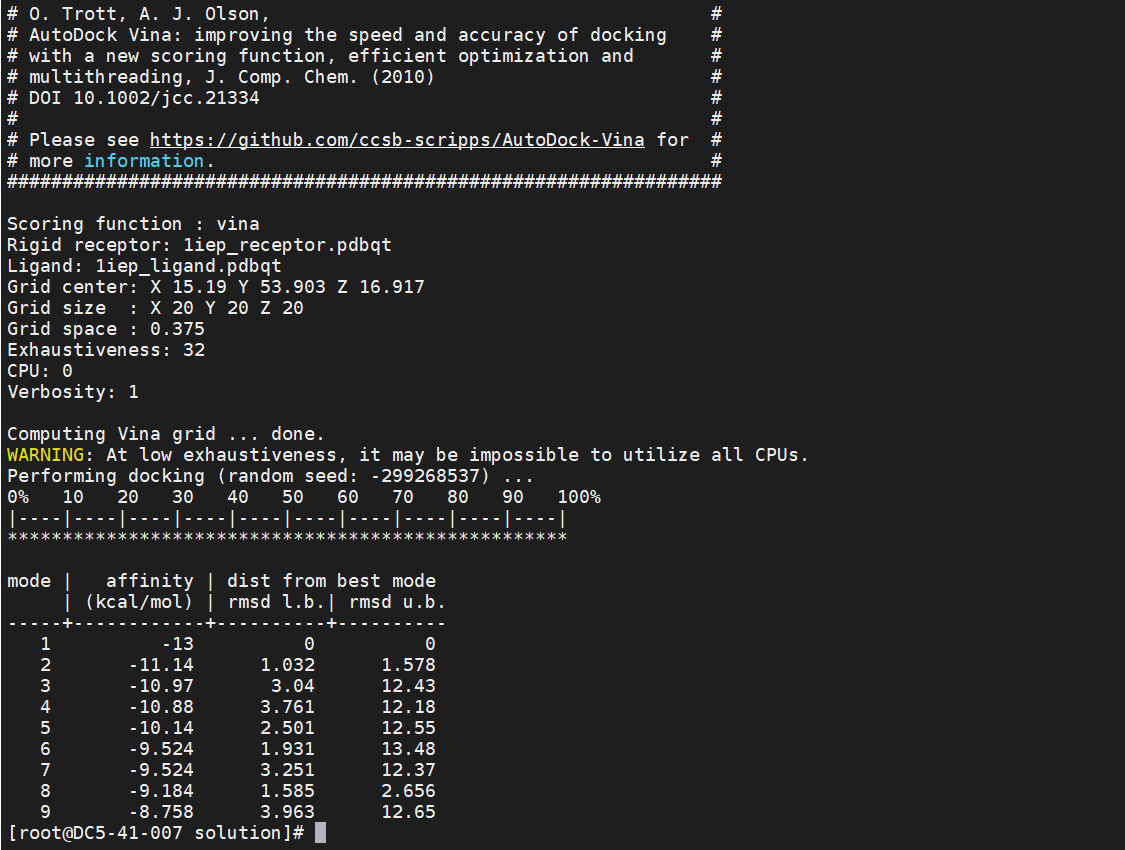
vina --receptor 1iep_receptor.pdbqt --ligand 1iep_ligand.pdbqt \--config 1iep_receptor_vina_box.txt \--exhaustiveness=32 --out 1iep_ligand_vina_out.pdbqt
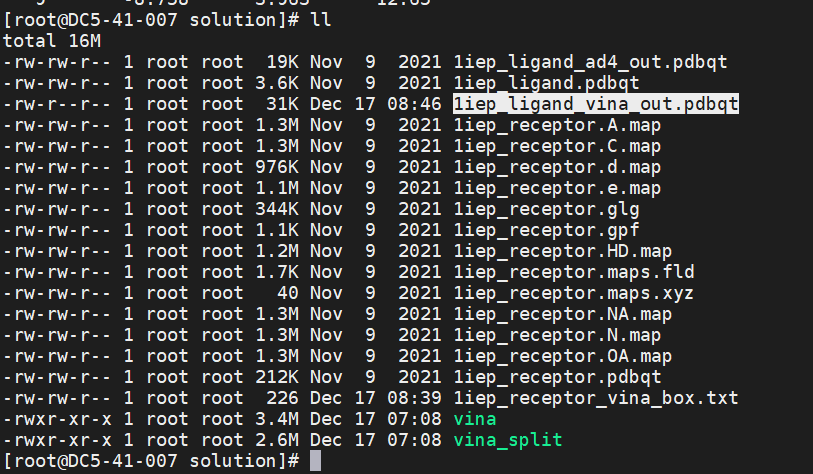
If the execution result is displayed and the 1iep_ligand_vina_out.pdbqt file is output, the interconnection with the Vina is complete.
Execution result:

Output file:

----End
8. Change History
| Released On | Change History |
|---|---|
| 2023-02-09 | This issue is the first official release. |
